+49 030 6959 250 frage@taube-electronic.de

To the limit and beyond

8. September 2022

With the investment in the new QUADRA7 X-ray inspection system, the question of the limits of what can be detected was posed. It would have been easiest to take the manufacturer’s specifications from the marketing documents, but this did not meet our own quality requirements. Research showed that there is no valid international standard available for the measurement of very small focal spot sizes in X-ray tubes. The current standard for industrial X-ray machines, DIN EN 12543-5:1999-12, is only valid for focal spot sizes down to a minimum of 5µm.

Why does the size of the focal spot matter at all ?  The resolution of X-ray machines depends, among other things, on the size of the focal spot (see below). Thus, X-ray images show areas of blurring due to the finite extension of the focal spot. If two objects come closer and closer to each other, these areas of blurring will eventually prevent the two objects from being clearly detected as separate objects.
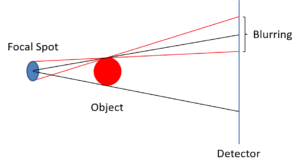
In order to measure the focal spot size in the new QUADRA7, tests were therefore carried out together with specialists from the Federal Institute for Materials Research and Testing (BAM, Berlin), using the new NanoXSpot target (see below) which represents the basis of the new draft for the standard. The evaluation of these measurements and its results will be discussed in one of the next contributions.
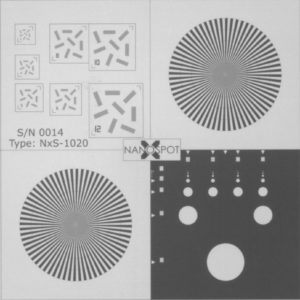
NanoXSpot Target-BAM Berlin Xray image taken with the QUADRA 7


5x5km TEAM relay race

„Success is no coincidence, but the result of hard training and perseverance“ © Pelé 2024 was that time again : The whole of Berlin was like deserted, because...

VHX Keyence

Recognizing the problem is more important than recognizing the solution, because the exact representation of the problem leads to the solution. © A. Einstein The...

TAUBE ELECTRONIC uses SMART SEARCH PRO

It is not too little time we have, it is too much time we do not use effectively Seneca noted this around 2000 years ago. In order to make the purchasing of...

New EFA inspection system

„Often you see things a hundred, a thousand times before you really recognize them for the very first time.“ © C. Morgenstern The new EFA inspection system is the...

The latest X-ray technology in use at TAUBE ELECTRONIC

A completely new order of magnitude in quality assurance has been achieved by installing the Quadra 7 X-ray unit from Nordson Dage. At TAUBE ELECTRONIC X-ray...

Successful first year with the two new JUKI SMD placement modules RS-1R

TAUBE ELECTRONIC has been successfully using two new JUKI RS-1R placement machines in production since November 2020. After dismantling the old machines and...

Successful recertification audit according to DIN EN ISO 9001:2015-11

This year, the ISO 9001:2015 audit took place under special conditions. Due to the current pandemic situation, the entire recertification audit had to be carried...

01005 components with distance of 60µm to Tantal-A capacitors

In the course of tighter and tighter layouts, this project was intended to test the limits of what is currently feasible with regard to different component sizes...

Expansion of the management board at TAUBE ELECTRONIC

Last December Dr. Lothar Weitzel joined TAUBE ELECTRONIC GmbH as Managing Director. The company was already well-known to him, as he had previously worked with...

300µm

TAUBE ELECTRONIC successfully enters 300µm pitch component class TAUBE ELECTRONIC since many years is one of the pioneers in processing components with very fine...

X-ray Fluorescence-Spectroscopy

TAUBE ELECTRONIC starts to operate new Fischerscope X-Ray XDV-SSD Since the implementation of leadfree RoHS compliant assembly processes Micro X-ray fluorescence...

Glued Printed Circuit Board

Printed circuit board with stencil printed SMT adhesive in conveyor system of the pick and place machine.

Wetting failure on NiAu-Metallization

Wetting failures on NiAu-surfaces may have different root causes.

Fiducials

Fiducials according to SMEMA-standard have to be provided on all printed circuit boards, which have to be processed automated. The current revision of...

Hidden solder joints

Even with hidden solder joints on conventional leaded components it is required to x-ray for process qualification and testing. By analysis of PCBAs, which were...

Conterfeit components

Components that have been bought from brokers after agreement of customers have to be carefully and in an extended procedure inspected at incoming goods inspection.

Component Failure

A bond wire has been evaporated by electrical overstress. Only visible by x-ray inspection!

Adhesive stencil printing

SMT-components which have to be soldered by wave soldering process before soldering have to be glued to the printed circuit board. The most economical technique is...

X-ray inspection with GE microme|x

For process qualification and inspection of covered solder joints high resolution x-ray inspection is an indispensable condition.

JET-Printing or JET-Dispensing

JET-Printing or JET-Dispensing is a relatively new alternative methode for the application of solder paste. Advantages Stencil free paste printing Flexible...

Stencil printing

Paste printing is one of the most important factors for quality of solder joints and thus for the reliabiltiy of electronic assemblies. In the stencil printing...

X-Ray Image of Tantalum Capacitor

Wrong color images often improve the possibility to interpret difficult x-ray images.

Limited Reliability of Solder Joint with Vias in Pads

Vias in pads are a big reliability risk for solder joints, if components are reflow soldered. Often the solder is sucked from the pad through the via, causing a...